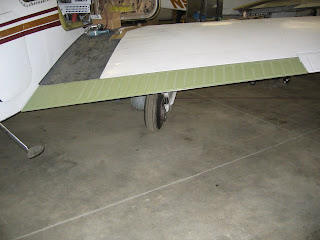
The original plan was to add an after-market product from Precise Flight called Speed Brakes. This equipment allows rapid descent from altitude without shock cooling the engine. Fortunately, Aviation Research did the original certification of these speed brakes on the Bonanza and they shared their experience with me before I installed them. On the older Bonanza, there is significant vibration when the speed brakes are deployed due to the wing design of the Bonanza. Jerry at Aviation Research advised me that I would be probably be happier with a kit to allow the extension of the landing gear at significantly increased airspeed. So the High Speed Gear Door kit was ordered and installed. Little did I know that installing this kit is a major project.
So many days later the new gear doors are fitted and installed. With this modification, I will be able to extend the landing gear at 145 MPH (125 Knots), with a placarded emergency gear extension speed of 175 MPH (150 Knots). The original gear extension speed was 123 MPH (105 Knots). Better than speed brakes and just as effective.
Monday, February 23, 2009
Interior Support Rails
In anticipation of the needs of the upholstery shop, Jerry at Aviation Research has been preparing the required support rails. The new interior will be modular, similar to more recent airplane interiors, and much easier to remove if needed to work on concealed wiring. The photos below show the new aluminum rail installed along the sidewall.


In the photo below, a temporary door panel has been attached to the support rail to check the fit. The entire process is extremely labor intensive and requires great attention to detail. But the final product should be worth it!


In the photo below, a temporary door panel has been attached to the support rail to check the fit. The entire process is extremely labor intensive and requires great attention to detail. But the final product should be worth it!

The Wiring Harness
It is now February 23, and the work oh-so-slowly continues. The incredibly complex wiring harness is expected to be finished this week and fully tested.

This photo shows the wiring harness in process. The connections and lacing are made on a mock-up of the actual panel, and then the entire harness is moved to the airplane.
 This photo shows the mock-up from the front. The two Aspen PFD units are shown with the protective blue film. Once this is completed, all the avionics will be removed and transferred along with the complete wiring harness to the actual panel, which is presently mounted in the airplane.

Here is a photo of the new instrument panel installed in the airplane. By the end of this week, the new harness should be installed and the addition of the avionics will begin.

This photo shows the wiring harness in process. The connections and lacing are made on a mock-up of the actual panel, and then the entire harness is moved to the airplane.
 This photo shows the mock-up from the front. The two Aspen PFD units are shown with the protective blue film. Once this is completed, all the avionics will be removed and transferred along with the complete wiring harness to the actual panel, which is presently mounted in the airplane.
Here is a photo of the new instrument panel installed in the airplane. By the end of this week, the new harness should be installed and the addition of the avionics will begin.
Tuesday, February 3, 2009
Status of the various projects
The Instrument Panel

Here is an image of the final design for the instrument panel. This panel is presently mounted in the airplane and the wiring harness is being finalized. All of the avionics have been installed and tested and the "smoke test" on the panel was successful (i.e. none of the magic smoke leaked out). We are looking at perhaps 10 days before the panel is completely wired and ready for final testing.
The Paint Scheme

I worked with Craig Barnett at Scheme Designers to develop a paint scheme that would have a significant visual impact, draw attention to the airplane and carry the quality embedded throughout this aircraft. I am very pleased with the results. Here is a photo of the model showing the final paint scheme.
Monday, February 2, 2009
The Snow Arrives
Portland, Oregon is frequently hit by bad winter weather. 2008 was no exception. Over 4 feet of snow fell at the Sandy River Airport, and although this did not directly create a problem, it did delay the work on the airplane. Then the warm rains came, the snow load on the hangar roof went up way past design limits, and the hangar roof collapsed!
Not completely, however, and the airplane escaped damage. But the work has now stopped until a new hangar can be arranged. So the enterprising team at Aviation Research arranged a short term lease on some adjacent undamaged buildings, the airplane was moved, and the work started again.
Not completely, however, and the airplane escaped damage. But the work has now stopped until a new hangar can be arranged. So the enterprising team at Aviation Research arranged a short term lease on some adjacent undamaged buildings, the airplane was moved, and the work started again.
Re-installing the new engine
During the examination of the engine area, the astute mechanic at Aviation Research noted that there was some cracking in the aluminum in the area of the nose bowl. Although cracking does occur, it generally appears on older airplanes and not in a new installation. so we pulled the engine (installed just a year ago) and examined the installation. What we found was simply frightening.
The mechanic that had originally done the work in rebuilding the nose bowl to accommodate the new engine did as bad a job as Aviation Research had ever seen. Parts were forced to fit, holes were drilled and elongated, the engine mounts were installed incorrectly, and the wrong engine mounting bolts were installed (they could be turned by hand prior to removal of the engine). New parts were damaged beyond repair.


When the parts were assembled, the drill shavings were not even cleaned from the mating surfaces. We were now faced with a complete rebuild of the nose bowl and re-installation of the new engine. An effort of nearly 3 months and a significant expense. The only bright spot is that the mistake had been discovered and was correctable. So the work began.
In the meantime, work continued on other parts of the airplane. The autopilot servos were installed, new honeycomb aluminum floorboards were fitted, the tip tanks and the related fuel system went in without a hitch. We re-scheduled the paint and interior for May, 2009 and feel like that is an achievable date.
The mechanic that had originally done the work in rebuilding the nose bowl to accommodate the new engine did as bad a job as Aviation Research had ever seen. Parts were forced to fit, holes were drilled and elongated, the engine mounts were installed incorrectly, and the wrong engine mounting bolts were installed (they could be turned by hand prior to removal of the engine). New parts were damaged beyond repair.


When the parts were assembled, the drill shavings were not even cleaned from the mating surfaces. We were now faced with a complete rebuild of the nose bowl and re-installation of the new engine. An effort of nearly 3 months and a significant expense. The only bright spot is that the mistake had been discovered and was correctable. So the work began.
In the meantime, work continued on other parts of the airplane. The autopilot servos were installed, new honeycomb aluminum floorboards were fitted, the tip tanks and the related fuel system went in without a hitch. We re-scheduled the paint and interior for May, 2009 and feel like that is an achievable date.
One Year Later...
Well, what a difference a year makes. All the good flying weather has come and gone, the feared delays in receiving the new avionics turn out not to be an issue, and we continue to find problems.
First we find that the brief encounter with the runway that precipitated a new engine also resulted in a bent nose gear retract rod. With that repaired, we found cracking on the right flap at the hinge, so a new flap was ordered.

And then we discovered that the left aileron had a loose part (a bolt, perhaps?) inside the skin, so it was sent out to be re-skinned. Then, disaster strikes.
First we find that the brief encounter with the runway that precipitated a new engine also resulted in a bent nose gear retract rod. With that repaired, we found cracking on the right flap at the hinge, so a new flap was ordered.

And then we discovered that the left aileron had a loose part (a bolt, perhaps?) inside the skin, so it was sent out to be re-skinned. Then, disaster strikes.
Subscribe to:
Comments (Atom)


